


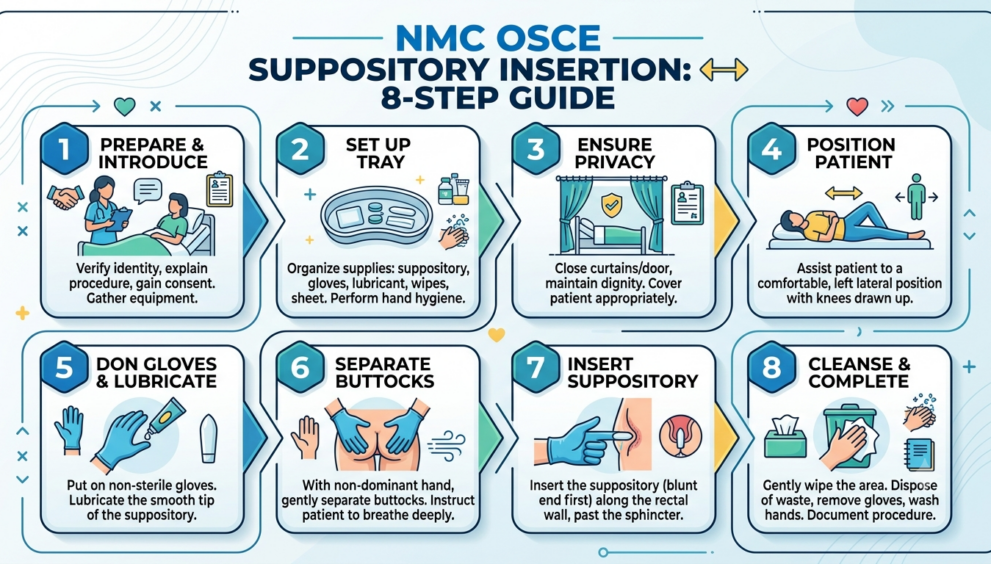
Station Overview & Core Objectives
The suppository insertion station is a 10-minute clinical skill station. Because it is classified under medication administration, you must flawlessly merge technical skill with strict adherence to the NMC Code regarding patient dignity, safety, and clear professional communication.
Step-by-Step Exam Walkthrough
1. Scene Safety, Privacy, & Initial Introduction
- Action: Ensure the environment is safe to enter. Close the door and draw the cubicle curtains completely to protect patient dignity.
- Hand Hygiene: Perform hand hygiene using the correct WHO 6-step technique.
- Communication: Greet the patient, state your name, and clearly explain the purpose of your visit:
“Hello, my name is [Name] and I am one of the registered nurses looking after you today. I am here to administer a glycerol suppository as prescribed by your doctor to help relieve your constipation.”
- Side Effects: Explain the common side effects (e.g., abdominal cramps, loose stools, or transient diarrhoea) in simple, accessible language. Ensure they know a bedpan, commode, or toilet is immediately available. Seek initial verbal consent.
2. Primary Identity & Allergy Verification
- Action: Ask the patient to state their full name and date of birth.
- Cross-Check: Cross-reference this verbal information directly against the patient’s ID wristband and the prescription chart (Drug History Sheet / MAR chart). In a hospital setting, verify the unique hospital identification number.
- Allergies: Verbally ask the patient about their allergy status. If they state an allergy, ask what specific reaction they experience and verify if it matches the prescription chart red band.
3. Prescription Validation & Equipment Gathering
- Validation: Check the prescription chart for the 6 Rights of Medication Administration: Right Patient, Right Drug, Right Dose, Right Route, Right Time/Frequency, and Right Documentation. Ensure the prescriber’s signature is valid.
- Collection: Clean an injection/procedure tray and collect your equipment:
- Glycerol suppository container/pack (Verify medication name, dose, and expiry date against the chart)
- Gallipot containing sterile water
- Sterile gauze pieces
- Incontinence pad (bed protector)
- Personal Protective Equipment (Disposable apron and clean gloves)
- Action: Perform hand hygiene, don your apron and gloves, and return to the patient side.
4. Re-verification & Anatomical Positioning
- Re-check: Reconfirm the patient’s identity and allergy status briefly at the bedside before proceeding.
- Positioning: Clearly verbalize the required positioning to the assessor and the patient:
“I will now assist you into the left lateral position with your knees flexed up toward your chest, your feet slightly raised, and your buttocks positioned close to the edge of the bed.”
- Dignity: Secure explicit permission before exposing the area. Place the incontinence pad under the patient’s buttocks, keeping unnecessary exposure to an absolute minimum.
5. Pre-Insertion Rectal Assessment
- Action: Before touching the patient, visually inspect the perianal area and verbalize your clinical findings aloud to the assessor.
- What to look for: State that you are assessing for the absence of localized soreness, skin excoriation, active haemorrhoids, visible oedema, rectal prolapse, or active infestation.
6. Correct Lubrication & Insertion Technique
- Lubrication Rule: Open the suppository pack. Dip a piece of sterile gauze into the sterile water, and use that damp gauze to lubricate the tip of the suppository. Note: Never apply tap water or unapproved lubricants directly to the mannequin.
- Communication: Ask the patient for permission immediately before touching the buttocks.
- Insertion: Gently separate the buttocks. Instruct the patient to take a deep breath in to relax the anal sphincter. Insert the suppository apex-first (or according to local guidelines) and verbalize that you are advancing it approximately 2–4 cm beyond the anal sphincter so it settles into the rectum and is not retained merely in the anal canal.
- Post-Insertion: Withdraw your gloved finger. Use a clean, dry gauze piece to gently wipe away any excess moisture or lubricant from the perianal skin. Immediately cover the patient back up.
7. Post-Procedure Aftercare Instructions
This is a critical marking criterion that cannot be rushed. Clearly instruct the patient on the following aftercare points:
- Request that they remain lying down in position for approximately 20 minutes to allow the medication to dissolve and absorb effectively.
- Advise them that they may experience a slight sensation of liquid discharge as the suppository melts.
- Explain that they will likely feel an increasing, strong urge to open their bowels.
- Reiterate that the incontinence pad will remain underneath them for safety, and hand them the call bell, emphasizing that you or a colleague will assist them to the bathroom or provide a commode the moment they feel ready.
8. Disposal, Decontamination, & Final Documentation
- Waste: Dispose of all used gauze, packaging, gloves, and apron into the appropriate hazardous/clinical waste bin (yellow/orange bag) according to hospital policy.
- Decontamination: Clean the equipment tray according to local guidelines and perform thorough hand hygiene.
- Documentation: Immediately sign and date the prescription chart to record that the medication was successfully administered.
- Closing Health Education: Offer brief, supportive health promotion tips to the patient regarding long-term bowel health before leaving:
“To help manage and prevent constipation in the future, it is highly beneficial to drink plenty of fluids throughout the day, increase your dietary fibre intake, and maintain light, regular physical activity as tolerated.”
- Assessor Statement: Conclude by verbally stating to the examiner that the procedure is complete, the patient is left comfortable with the call bell in reach, and all documentation has been completed in accordance with NMC guidelines.
High-Yield Exam Memory Aid: C-L-E-A-N
| Letter | Action Step | Clinical Application |
|---|---|---|
| C | Check the Site | Visually assess for prolapse, haemorrhoids, and skin breakdown before inserting. |
| L | Look for Identifiers | Validate the 2 patient identifiers, allergy status, and cross-reference with the MAR chart. |
| E | Ensure Correct Position | Place the patient in the left lateral position with knees flexed. |
| A | Advance Correctly | Lubricate using wet gauze and advance the suppository 2–4 cm past the sphincter. |
| N | Note and Instruct | Provide post-insertion rules (stay flat for 20 mins), sign the chart, and document. |
⚠️ Critical OSCE Pitfalls to Avoid
- The Direct Lubrication Error: Do not pour water or squeeze lubricant directly onto the suppository or the mannequin without using the intermediate gauze step described in the protocol.
- The Disappearing Signature: Forgetting to sign the prescription chart immediately after administration is a critical medication error that can result in an automatic station failure.
- Rushing Aftercare: Failing to explicitly tell the patient to remain flat for 20 minutes or failing to explain the expected side effects causes a significant loss of communication and management marks.
How FortuWest International Supports Your OSCE Success
Succeeding in the NMC OSCE requires translating theoretical steps into fluid, time-managed, and highly professional clinical habits under exam pressure.
At Fortu West International, our tailored OSCE preparation courses focus intensely on scenario simulations, communication nuances expected by UK examiners, and step-by-step physical mastery of every skills station. We break down dense clinical checklists into logical, repeatable clinical routines, ensuring you approach the exam with complete confidence and secure your professional registration smoothly.
Lorem ipsum dolor sit amet, consectetur adipiscing elit. Ut elit tellus, luctus nec ullamcorper mattis, pulvinar dapibus leo.